As soon as we decided to go to New Zealand, I knew a good hike was in our future. New Zealand’s landscape is so diverse between its beaches, rolling, hills, and volcanic mountains and, thankfully, there are trails everywhere to get you to some amazing views!

Initially, when we started looking at the Tongariro Alpine Crossing, I was worried about a few things:
- It looks like a really intense hike for the pros – of which I am not
- It was hard to judge the temperature of the hike, especially in May when the weather is turning cold and snow can cap the mountain peek
- I wasn’t sure what to bring or pack
- I am clumsy and didn’t want to fall to my death…
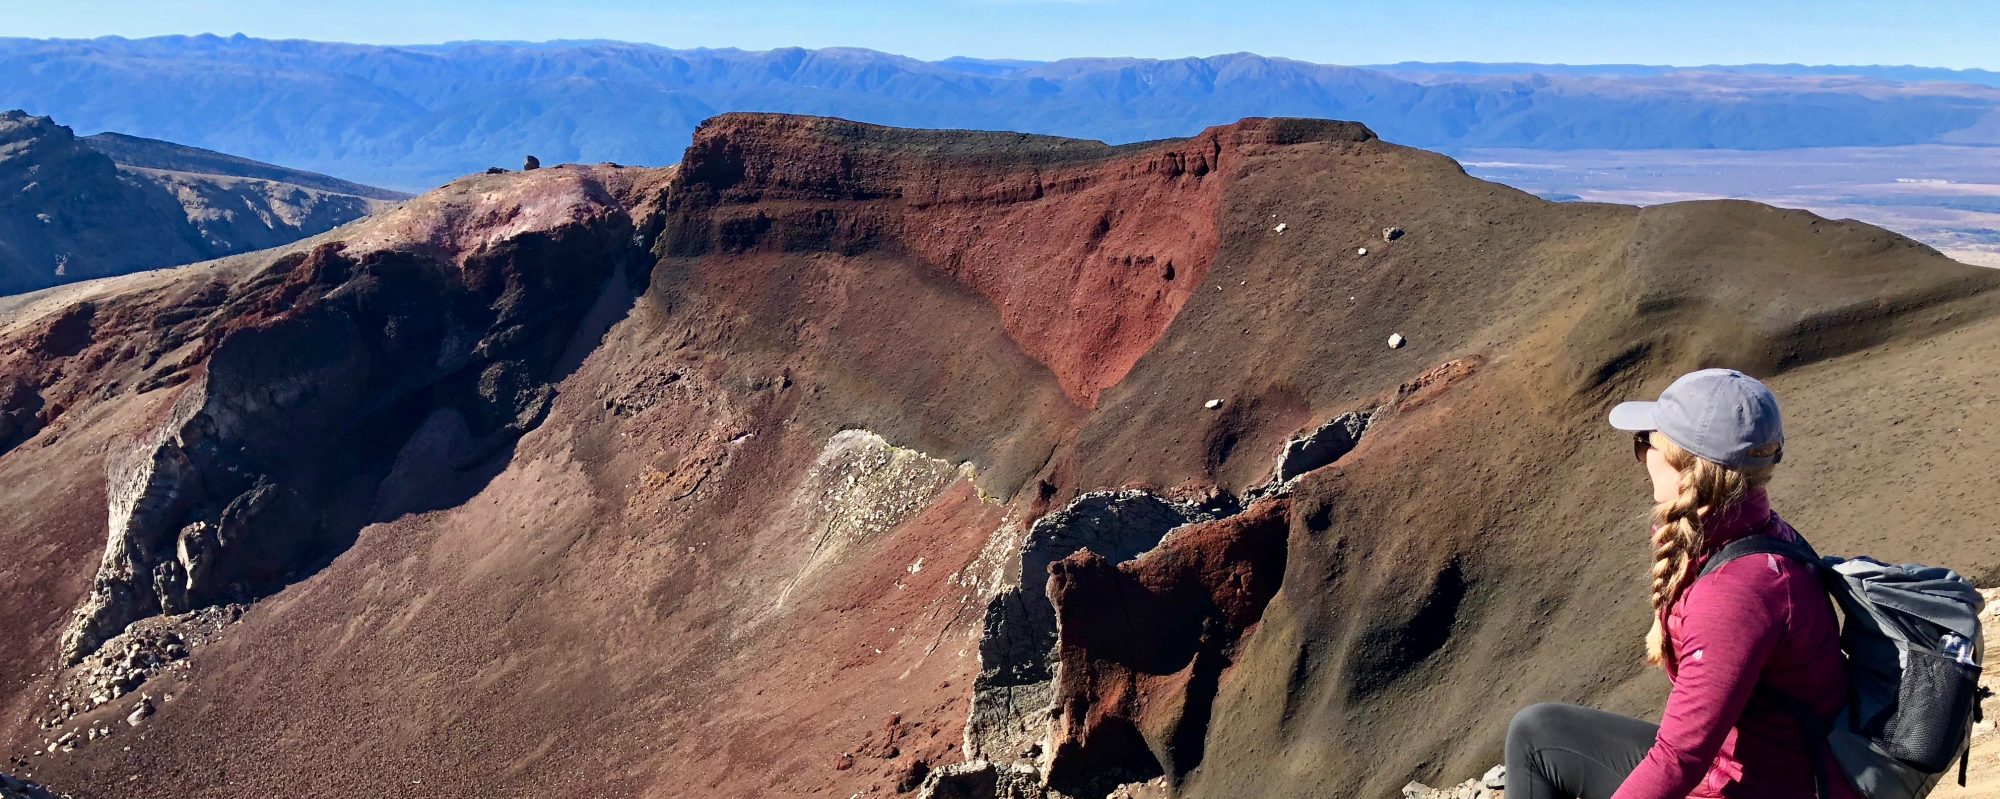
All of these things initially make me wary of the trail, however, I can tell you that I am alive and it was one of the most amazing hikes of my life! If you are physically active and are OK with long walks, you should not have a problem. The up-hill parts were very steep but, if you take it one step at a time and break when you need to, it is a great hike. Plus, you won’t want to power through the views!
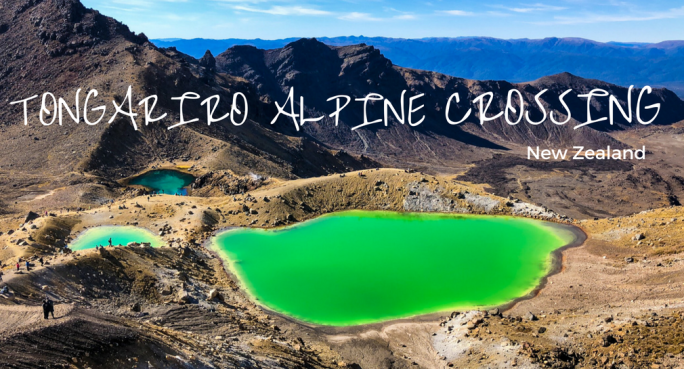
With all of that said, let me walk you through the Tongariro hike and the best way to approach it so you can experience a view like this in real life #nofiltersneeded:

First off: Weather – When looking at the potential weather for our hike, it ranged from 50 degrees fahrenheit at the base to a potential low of 30! Theoretically, the mountain gets colder as you hike up but, for us, it got warmer as the sun came out and we got hot from hiking such a steep climb. I took off more and more clothes as we gained altitude, but was happy I had all of they layering options. If you are not going in April / May, research temps beforehand and keep in mind it will vary throughout your hike. What I wore is below:
- Hat & sunnies: A must have! It is so sunny and you will burn your face). I also brought a beanie but did not end up wearing it.
- Gloves for the cool morning
- Upper layers: Sweat wicking tee shirt, Lululemon fitted jacket, puffer jacket with hood, and, on top of all that, a rain jacket
- Pants: under leggings and then a looser, warm top legging. I probably could have just warn the warm leggings and would have been fine. See fancy leggings below:

- Hiking boots with sweat wicking hiking socks – a total must! At the peek of the hike, the mountain top is all gravel and is very slick. It can also get into your shoes. High socks that prevent blisters and hiking boots with ankle support will give you the best grip and lessen the chance of rolling and ankle. I loooove my Lowa boots and wore them the majority of my New Zealand trip:

I also brought a packable backpack on the hike to carry all of my excess layers and other must-haves:
- Packable backpacks fold into themselves so you can easily bring them in your luggage without taking up too much room. I cannot tell you how much they come in handy when going on hikes or to the beach. I bring my on every trip I take.
- Food: We bought bread and PB/J to make sandwiches for our lunches in New Zealand. We made a few for lunch on our hike and also packed some nuts from our hotel for snacks. I always bring Quest Bars with me on trips too for a healthy protein snack too and we ate those about 1.5 hours into the hike. The thing we didn’t bring, which we regretted, were bananas. Ryan got really bad cramps half-way up to the summit and bananas would have helped with that.

- Liquids: Bring at least 2-3 bottles of water. Your hike can be up to 6 hours and you will need it. If you are questioning if you have enough, go ahead and grab more. You will thank me!
- Misc.: AKA, Chapstick because, obviously. Extra hair tie, lots of sun screen, hand sanitizer, toilet paper (because the porta potties WILL run out), bandaids, and moisturizer.
Now that we have gone through prepping for the hike, there is something else we should cover – lodging and transport!
Lodging; You can stay in the National Park town which is where most of the transports for the hike start from. There are a bunch of little hotels and a few restaurants, but the town itself is pretty sparse. If you want a much better option (in my opinion), stay at the Tongiraro Suites @ The Rocks. It is about 15 minutes south of the town and the best little hotel I have ever stayed at! We watched the moon rise over the mountain top from our bed (view from our room is featured below). With views like that, freshly baked, warm croissants delivered to our door every morning for breakfast, a luxurious wooden spa, fuzzy blankets to use outside to watch shooting stars, and more, the Suites made our sleep the night before resfult and hike recovery so easy! They even had warming racks to dry our sweaty boots after the hike. The owners literally thought of everything and I would give this place a 15 out of 10 if I could. Read more about our stay here.

Lastly is transportation into the National Park to the base of the hike. There are a bunch of services on TripAdvisor that will take you to the start of the hike, but we used National Park Shuttles. Since it is not a circular trek, you have to get a shuttle to drop you off at the start of the hike and then pick you up at the end. They have different pick up times from the end, pending your hiking speed, and will ensure that you are counted as “off the mountain” at the end of the day. The ride from the town to the base is about 25 minutes and it takes about an hour from the end fo the hike to get back to town.

I hope this has been helpful and has persuaded you that this is a “must do!” while in the North Island of New Zealand. Let me know if you have any other questions about our experience on this amazing treck! Happy hiking!


